Leather Repair Kit Guide: Fix Scratches, Cracks, Peeling, and Color Loss

A leather repair kit can save a favorite couch, chair, car seat, shoe, or bag, but only when it is matched to the right kind of damage. Some problems need cleaning. Some need color. Some need filler. Some need patching. The mistake is treating every mark as the same problem and expecting one product to solve all of it in one pass.
This guide explains how to look at the damage first, choose the correct repair approach, and finish the surface so the repair blends into the surrounding leather. It is written for smooth finished leather projects where the goal is a practical, cleaner-looking result at home.
Use a repair kit when the leather has physical damage such as scratches, cracks, gouges, peeling finish, or small missing areas.
Clean and dry the surface before repair so filler, color, and top coat can bond evenly.
Color should come after texture repair, because pigment alone cannot flatten rough cracks or rebuild missing material.
Small, patient repairs usually blend better than thick filler or heavy color applied in a hurry.
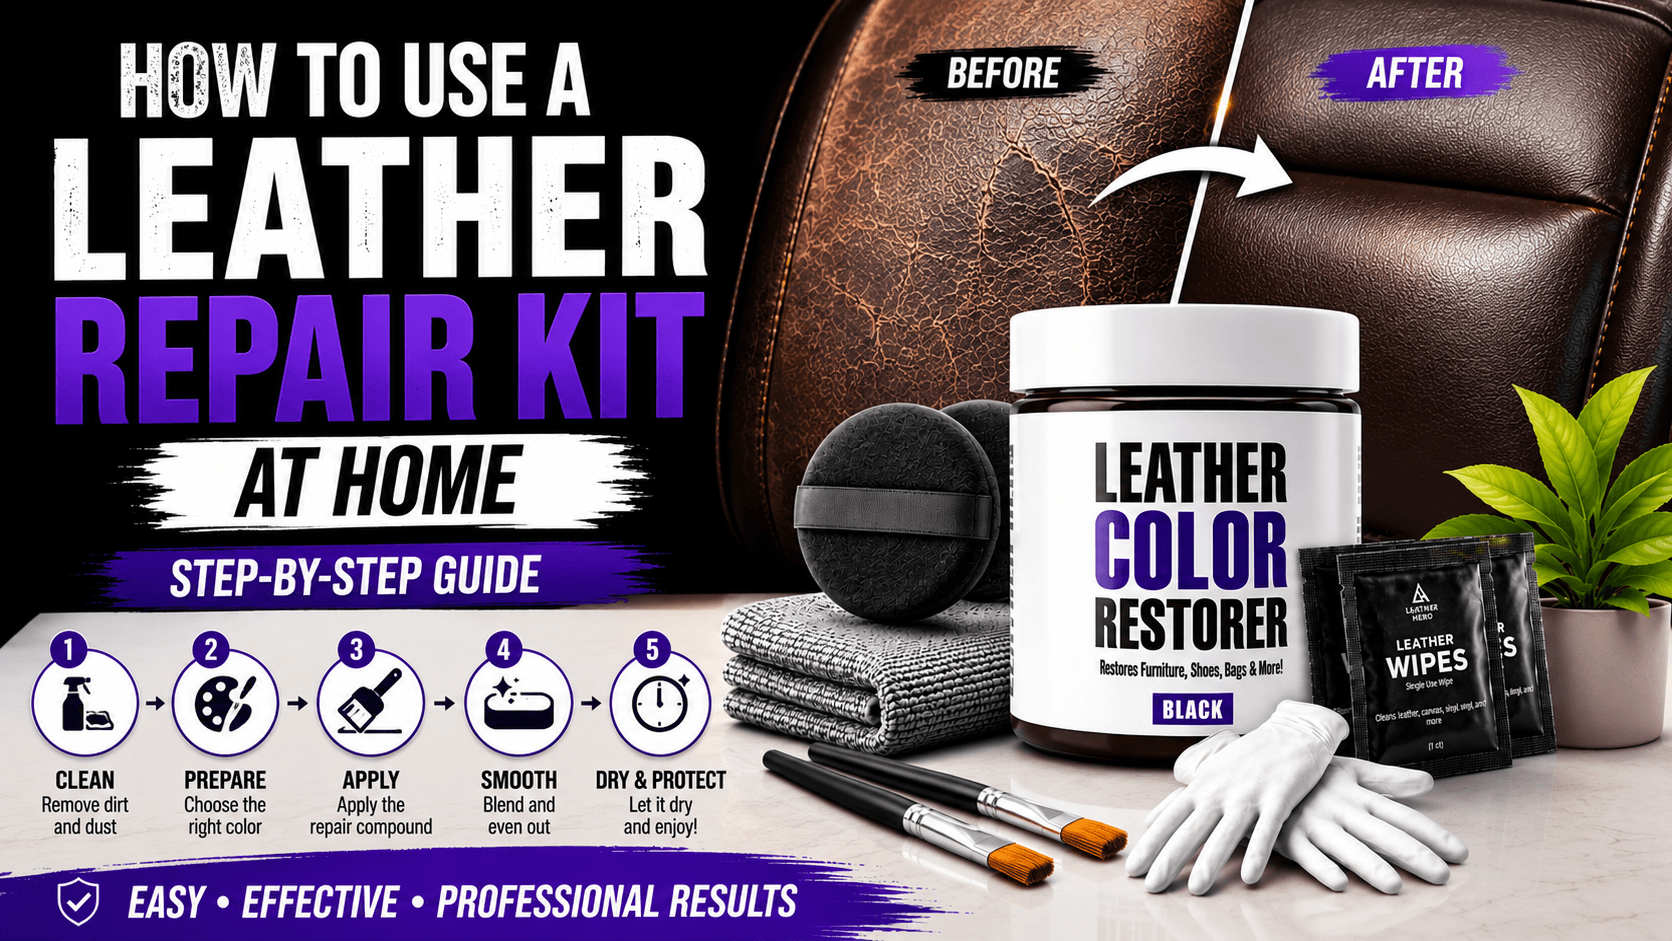
Restoration Flow
Diagnose the damage
Fill or smooth texture
Blend the color
Protect the repair
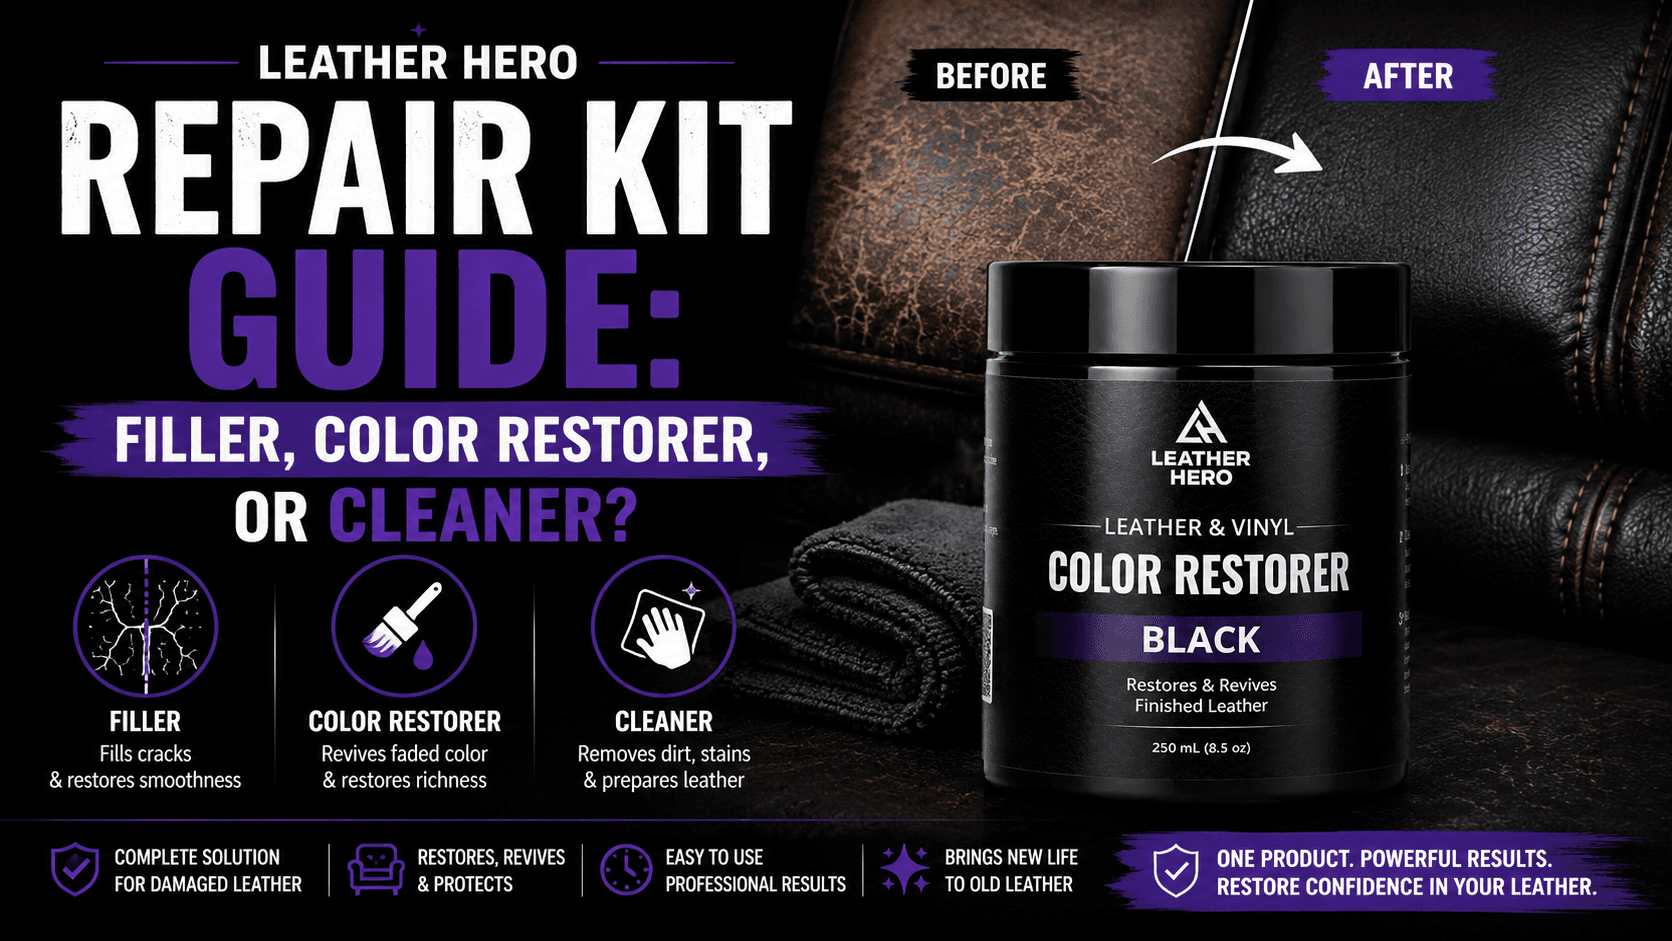
Identify the Type of Leather Damage
Start by naming what you see. A scratch is a line in the finish or surface. A crack is a split caused by dryness, stress, or age. Peeling may be a failing finish, bonded material, or previous coating lifting away. Color loss is fading or pigment wear without much texture damage. Each problem needs a slightly different response.
Touch the area gently. If it feels smooth but looks pale, you may only need color restoration. If it catches a fingernail, has raised edges, or shows missing material, repair comes before color. If the surface is actively flaking over a large area, restoration may be limited because the base material itself may be unstable.
Clean the Surface Before Repair
Repair products need a clean foundation. Dirt, wax, silicone sprays, body oil, and old conditioner can prevent filler or color from sitting evenly. Use a leather-safe cleaner and wipe beyond the damaged area so the repair blends into clean surrounding leather.
Let the leather dry fully before applying filler or color. Damp leather can change how repair compounds spread and cure. If you are repairing a couch, car seat, or handbag handle, give high-contact zones extra cleaning time because those areas collect the most oil.
Handle Scratches and Light Scuffs
Light scuffs may only affect the finish. After cleaning, apply a small amount of restorer or matching color to the affected area and feather it outward. Do not create a hard rectangle around the scratch. The goal is to soften the contrast between the scuffed line and the surrounding leather.
For deeper scratches, trim no material unless the repair kit specifically instructs you to remove loose fibers. Raised edges can sometimes be pressed, filled, or smoothed, but aggressive sanding can make the repair larger than the original damage. Work slowly and check the surface by touch as much as by sight.
Repair Cracks With Thin Filler Layers
Cracks need patience because thick filler can shrink, ridge, or remain visible. Clean the crack, apply a thin layer of filler, and let it dry according to instructions. Repeat if needed. The goal is not to bury the leather under a mound of repair compound; it is to level the damaged line enough that color and finish can blend naturally.
Cracked seating areas may flex after repair, so avoid making the surface stiff. Flexible, thin repair layers are usually more durable than a heavy patch on top. If cracks are widespread, restoration can improve appearance, but it may not make old leather behave like new leather.
Understand Peeling Before You Cover It
Peeling is tricky because it can mean different things. On finished leather, the top coating may be lifting. On bonded leather or lower-quality materials, the surface layer may be separating from the backing. If loose material continues to lift, color will not hold for long. Remove only unstable loose edges as directed, then smooth the area before recoloring.
If a large panel is peeling everywhere, a repair kit may deliver a temporary improvement rather than a permanent restoration. In that case, focus on stabilizing the most visible areas and setting realistic expectations. Small peeling spots are much better candidates for home repair than large failing surfaces.
Blend Color After Texture Is Fixed
Once the surface is clean, dry, and smooth, color can do its work. Match the original leather tone, not the damaged pale spot. Apply thin coats and feather outward. Let each coat dry before judging the match. A repair often looks too obvious when color is applied only to the exact damaged shape.
If you are repairing black leather, watch for gray edges around the repair. If you are repairing brown leather, watch for warmth and undertone. A dark brown that is too red or too flat can stand out. Testing saves time because dried color can look different from wet color.
Finish With Protection
A repaired area is usually more vulnerable than untouched leather, especially if it sits on a seat edge, shoe toe, purse handle, or armrest. A compatible top coat helps protect the color and creates a more even surface sheen. Choose the finish level based on the surrounding leather.
After protection, let the repair cure before heavy use. Avoid bending, sitting, or rubbing the area too soon. If the repair is on shoes or a car seat, give it more time than you think it needs. Early friction can disturb a repair that would have held up better after full curing.
Know When a Repair Kit Is Not Enough
A repair kit is useful, but it cannot solve every leather problem. Large torn seams, collapsed cushion foam, rotten leather, severe pet damage, and broad bonded-leather delamination may need upholstery work or replacement panels. Trying to cover those failures with filler and color can waste product and create a surface that fails again quickly.
Use the hidden-area test as a decision point. If the leather keeps flaking, if filler cannot grip, or if the area flexes so much that the repair cracks during testing, step back and reassess. A modest improvement that holds is better than an ambitious repair that looks good for one day and then peels away.
Make the Repair Blend Into the Whole Item
A repair can look obvious when only the damaged spot is treated. After the core repair is complete, clean and lightly refresh the surrounding panel so the repaired area is not sitting inside a dull, dirty border. This is especially helpful on couch cushions, car bolsters, and shoe toes where wear fades outward from a central point.
Blending does not mean covering the entire item with heavy color. It means softening transitions. Use light pressure, feathered edges, and careful inspection from normal viewing distance. If the item will be seen from across a room, judge it from across the room. If it is a shoe or handbag, inspect it in hand and in daylight.
Conclusion
A leather repair kit works best when it is used like a system: diagnose the damage, clean thoroughly, repair texture, restore color, and protect the finished area. Skipping the texture step is the reason many repairs look painted instead of restored.
For scratches, cracks, small peeling spots, and worn color on smooth finished leather, patient home repair can make a visible difference. Test first, build thin layers, and let the leather guide the pace of the project.
Match the product to the leather type, finish, and condition, then test it on a hidden area before full application.
Leather Hero Care Note
Recommended Product
Leather Filler Paste Kit
A focused product pick for the restoration steps in this guide.
Helpful References
Frequently Asked Questions
Can a leather repair kit fix peeling leather?
It can help with small peeling spots if the surface can be stabilized, smoothed, recolored, and protected. Large-scale peeling or bonded material failure may only improve temporarily.
Do I use filler before or after leather color restorer?
Use filler or repair compound before color when the surface has cracks, gouges, or missing material. Color should be applied after the repaired texture is smooth and dry.
Can scratches in leather disappear completely?
Light surface scratches can blend very well. Deep scratches may become much less visible, but the final result depends on depth, leather type, color match, and surface texture.
Should I seal a leather repair?
Yes, sealing is helpful for repaired areas that will be touched, flexed, cleaned, or rubbed. A top coat helps protect the restored color and even out the sheen.
Join The List
Leather Care, Delivered.
Get expert guides and exclusive offers in your inbox.